How To Setup On-Device Wake Word Detection For Voice Assistant using Micro Wake Word

Written by
Featured Video
In this article, we will look at how we can set up an ESP32 S3 with on-device Wake Word detection using MicroWake Word for your Voice Assistant to send commands to Home Assistant.
Table of Contents
Requirements
- Home Assistant up and running.
You can check this link to see how you can install it for the first time - ESPHome is setup and running
In case you have not set it up, you can look at it here. - ESP32 S3 N8R2 Dev Board
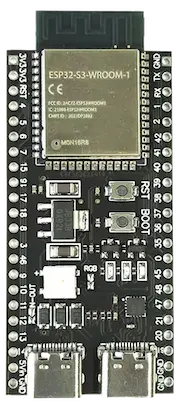
Guide for ordering ESP32 N8R2 or N16R8 Board is here
- INMP441 Microphone

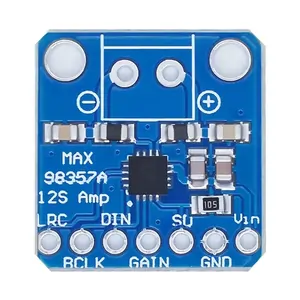
- MAX98357A Audio Amplifier
- 3-watt Speakers (Optional: Only required to listen to the pipeline output)

Set Up Voice Assist Pipeline
To set up voice assistant, we would need two components to create the Voice Assist pipeline in Home Assistant.
- Whisper: For speech-to-text
- Piper: For text-to-speech
Now, following the below video, you have set up these components in Home Assistant using Addons.
You will get to see how to set up the following components that are required
- Whisper Addon
- Piper Addon
- And finally the entire Voice Assist pipeline.
You don't need to set up the Wake Word addon, as we will use the on-device Wake Word detection with the Micro Wake Word framework
So make sure to watch it and set up the Voice Assist pipeline
Now we will look at how we can prepare our ESP32 S3 with a microphone and 3-watt speakers.
Circuit Diagram for ESP32 S3 With INMP441 Microphone & MAX98357A Audio Amplifier
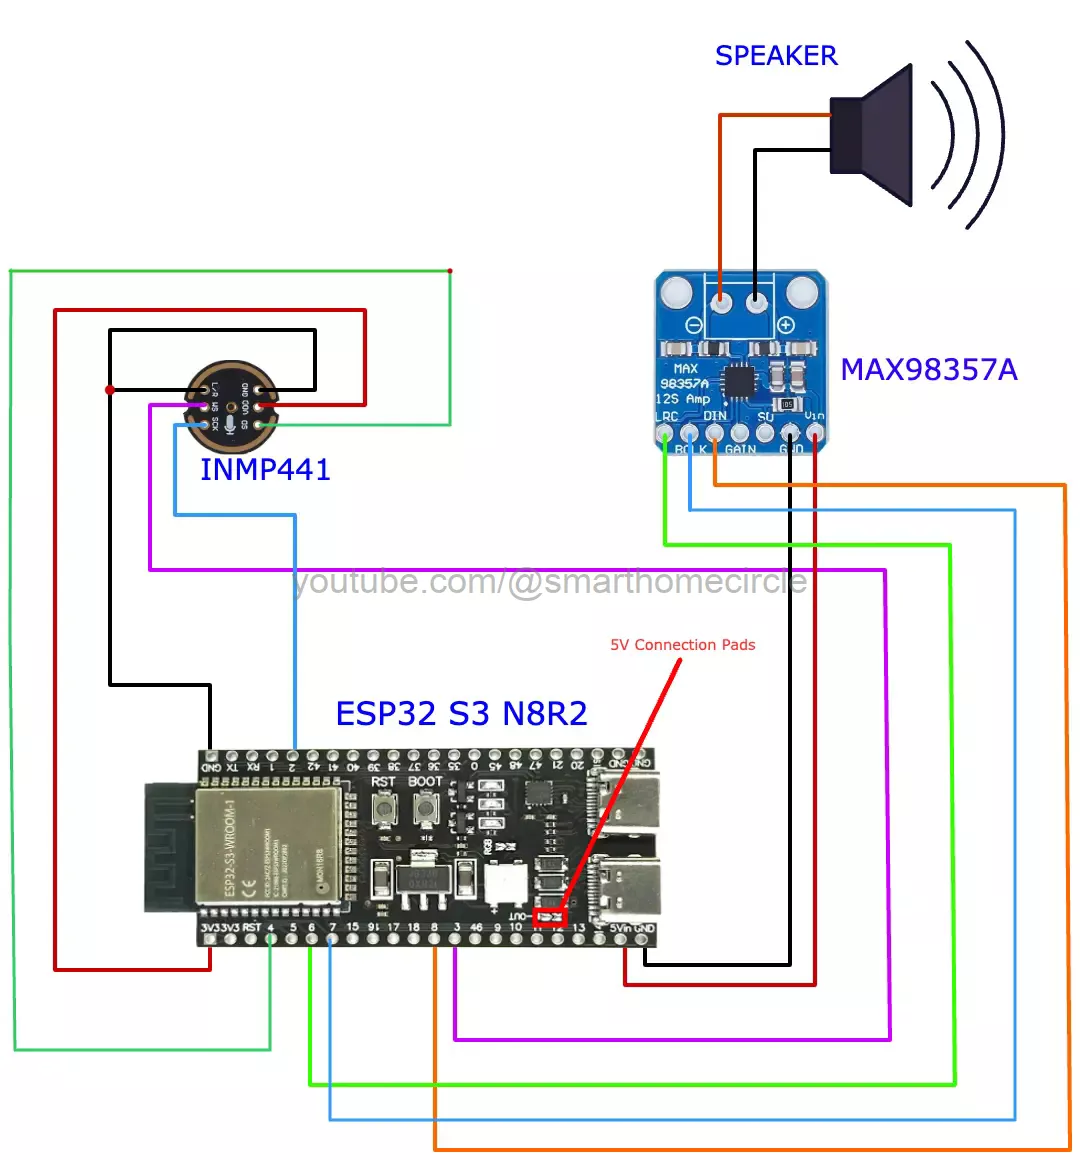
Important: You need to connect the 5v pads as shown in the diagram to enable 5v output on the 5v pin.
Here is the pin mapping table
| ESP32 S3 N8R2 or N16R8 | INMP441 Microphone | Speaker |
|---|---|---|
| Vin (5v) | Vin | |
| GND | Gnd | |
| GPIO 6 | LRC | |
| GPIO 7 | BLCK | |
| GPIO 8 | DIN | |
| GPIO 4 | SD | |
| GPIO 3 | WS | |
| GPIO 2 | SCK | |
| 3v3 | VDD | |
| GND | GND & L/R |
Once you have connected the microphone and the audio amplifier, let’s look at the code we must flash to the ESP32 S3 using ESPHome.
Flashing Code to ESP32 S3 with ESPHome
Note: I faced problems while flashing the ESP32 S3 from an M series Macbook, so I switched to a Windows system.
Now, you can follow these steps to flash the code required to make the ESP32 S3 work with the microphone and speakers.
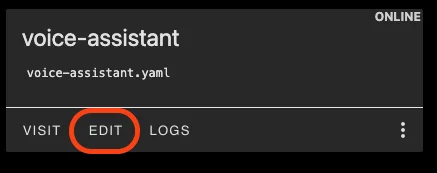
Step 1: Create a new device in the ESPHome dashboard by clicking on “New Device” in the bottom right-hand corner.
Step 2: Give it a name e.g. “Voice Assistant” and click “Next”.
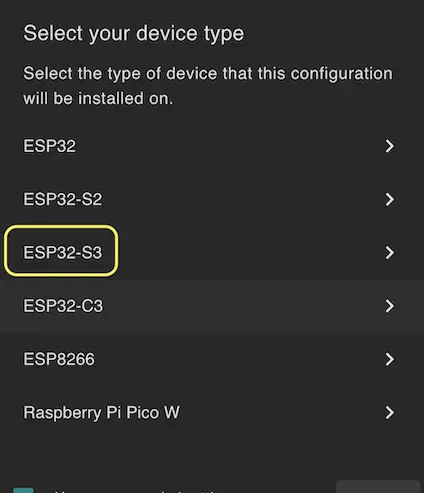
Step 3: Now select ESP32 S3 from the options
Step 4: Now, click on “Skip” and open the device card again by clicking on the “Edit” option.
Step 5: Place the following YAML code below.
The original yaml configuration is by "_bigbobba" from the Home Assistant Discord Channel
esphome:
  name: esp32-s3-wake-word
  friendly_name: ESP32-S3-Wake-word
  platformio_options:
    board_build.flash_mode: dio
  on_boot:
    - light.turn_on:
        id: led_ww
        blue: 100%
        brightness: 60%
        effect: fast pulse

esp32:
  board: esp32-s3-devkitc-1
  framework:
    type: esp-idf

    sdkconfig_options:
      CONFIG_ESP32S3_DEFAULT_CPU_FREQ_240: "y"
      CONFIG_ESP32S3_DATA_CACHE_64KB: "y"
      CONFIG_ESP32S3_DATA_CACHE_LINE_64B: "y"
      CONFIG_AUDIO_BOARD_CUSTOM: "y"

psram:
  mode: quad  # quad for N8R2 and octal for N16R8
  speed: 80MHz


# Enable logging
logger:
  hardware_uart: UART0

# Enable Home Assistant API
api:
  encryption:
    key: "TFpb+pBAvQIS1MVwaA7EoJ2DkpWE+79UvVro7yMyGdU="
  on_client_connected:
        then:
          - delay: 50ms
          - light.turn_off: led_ww
          - micro_wake_word.start:
  on_client_disconnected:
        then:
          - voice_assistant.stop:


ota:
  - platform: esphome
    password: "1245211a05eef56614a2ef5a3f3e971c"

wifi:
  ssid: !secret wifi_ssid
  password: !secret wifi_password

  # Enable fallback hotspot (captive portal) in case wifi connection fails
  ap:
    ssid: "Esp32-S3-Wake-Word"
    password: "LJfUrdJk3svP"

captive_portal:


button:
  - platform: restart
    name: "Restart"
    id: but_rest

switch:
  - platform: template
    id: mute
    name: mute
    optimistic: true
    on_turn_on:
      - micro_wake_word.stop:
      - voice_assistant.stop:
      - light.turn_on:
          id: led_ww
          red: 100%
          green: 0%
          blue: 0%
          brightness: 60%
          effect: fast pulse
      - delay: 2s
      - light.turn_off:
          id: led_ww
      - light.turn_on:
          id: led_ww
          red: 100%
          green: 0%
          blue: 0%
          brightness: 30%
    on_turn_off:
      - micro_wake_word.start:
      - light.turn_on:
          id: led_ww
          red: 0%
          green: 100%
          blue: 0%
          brightness: 60%
          effect: fast pulse
      - delay: 2s
      - light.turn_off:
          id: led_ww

light:
  - platform: esp32_rmt_led_strip
    id: led_ww
    rgb_order: GRB
    pin: GPIO48
    num_leds: 1
    chipset: ws2812
    name: "on board light"
    effects:
      - pulse:
      - pulse:
          name: "Fast Pulse"
          transition_length: 0.5s
          update_interval: 0.5s
          min_brightness: 0%
          max_brightness: 100%


 # Audio and Voice Assistant Config
i2s_audio:
  - id: i2s_in
    i2s_lrclk_pin: GPIO3  #WS
    i2s_bclk_pin: GPIO2 #SCK
  - id: i2s_speaker
    i2s_lrclk_pin: GPIO6  #LRC
    i2s_bclk_pin: GPIO7 #BLCK

microphone:
  - platform: i2s_audio
    id: va_mic
    adc_type: external
    i2s_din_pin: GPIO4 #SD pin on the INMP441
    channel: left
    pdm: false
    i2s_audio_id: i2s_in
    bits_per_sample: 32 bit

speaker:
    platform: i2s_audio
    id: va_speaker
    i2s_audio_id: i2s_speaker
    dac_type: external
    i2s_dout_pin: GPIO8   #  DIN Pin of the MAX98357A Audio Amplifier
    channel: mono

micro_wake_word:
  on_wake_word_detected:
    # then:
    - voice_assistant.start:
        wake_word: !lambda return wake_word;
    - light.turn_on:
        id: led_ww
        red: 30%
        green: 30%
        blue: 70%
        brightness: 60%
        effect: fast pulse
  models:
    - model: hey_jarvis

voice_assistant:
  id: va
  microphone: va_mic
  noise_suppression_level: 2.0
  volume_multiplier: 4.0
  speaker: va_speaker
  on_stt_end:
       then:
         - light.turn_off: led_ww
  on_error:
          - micro_wake_word.start:
  on_end:
        then:
          - light.turn_off: led_ww
          - wait_until:
              not:
                voice_assistant.is_running:
          - micro_wake_word.start:
Important: You need to set the PSRAM mode to octal or quad depending on the type of the board by referring to this link.
Step 6: click on “Save” and then click on “Install” on the top right-hand corner.
Step 7: Now, click on the “Manual Download” option and then choose “Modern Format”.
Step 8: Save the file to your computer.
Step 9: Open https://web.esphome.io. in Chrome or Edge browser.
Step 10: Now connect the ESP32 S3 dev Board to the laptop and click on “Connect” and you should get a popup window like this.
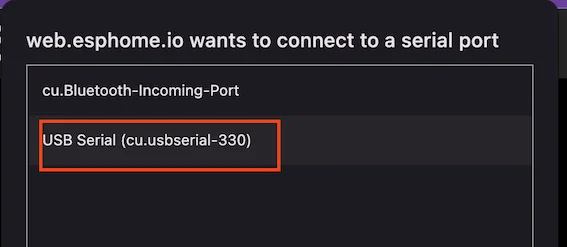
Step 11: Select the USB serial port for your device and click on “Install”
Step 12: Now load the file you saved in Step 8 and click on “Install”.

Note: In case the board does not go from connecting to erasing after some time, you can try to put the device into flashing mode. For this, press and hold the Boot button, then the Reset button, leave the Reset button, and then finally leave the Boot button.
With this, you have now prepared your ESP32 S3 to start receiving a voice command after detecting the Wake Word.
Next, we will connect it to Home Assistant.
Connecting ESP32 S3 As Voice Assistant In Home Assistant
Once the ESP32 S3 is flashed with the code in the above section, we will connect it to Home Assistant using the ESPHome Integration.
For this, follow these steps.
Step 1: Click “Settings” in Home Assistant in the left panel.
Step 2: Click on “Devices & Services”
Now, if the device is already auto-discovered, you can click on “Configure” and with this, the device is connected to Home Assistant.
If the device is not auto-discovered, then
Step 3: Click on “Add Integration” in the bottom right-hand corner.
Step 4: Search for “ESPhome” and click on it.
Step 5: Add the IP address of your ESP32 S3 board that is connected to your WiFi. Keep the port number as 6053 and click “Submit”
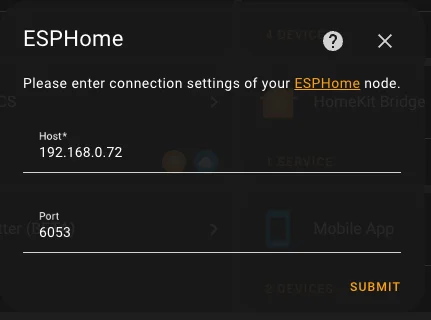
Step 6: If you are asked to enter the encryption key then you can find that in ESPHome under the property api: encryption: key. Copy and paste the key in the window.
With this, you are now done setting up the ESP32 S3 with On-Device Wake Word detection for your Voice Assistant connected to Home Assistant.
- My Local Voice Assistant Device
- Control LED Strip with Home Assistant Using WLED
- How I Added a Matter Device to Home Assistant