Written by
Featured Video
This article we will look at how you can connect an LG Washer with Home Assistant using LG ThinQ integration and configure a dashboard card.
Table of Contents
- Requirements
- Adding LG ThinQ Integration with Home Assistant
- Login Using The URL Redirect Authentication Method
- Finding the sensor entities of your devices
- Adding LG Washer Card to Home Assistant
- Setup Washer Card Code In Home Assistant
- Adding CSS resource to Home Assistant
- Adding LG Washer Template Sensors in Home Assistant
- Adding LG washer Card to Home Assistant
Requirements
-
Home Assistant should be up and running.
You can check 'How to Install Home Assistant' if your installing it for the first time. -
LG ThinQ App should be installed with Washer/Dryer already connected. In case it’s not set up, you can set it up with the help of video below
- HACS should be installed in Home Assistant.
In case it’s not setup, you can set it up using the video below
- SSH should have Access to Home Assistant.
In case it’s not setup, you can set it up using the video below
Adding LG ThinQ Integration with Home Assistant
Once you have the devices connected to the ThinQ app, we need to connect it to Home Assistant. For this, we will have to add the SmartThinQ LGE Sensors integration.
Let’s do that with the following steps:
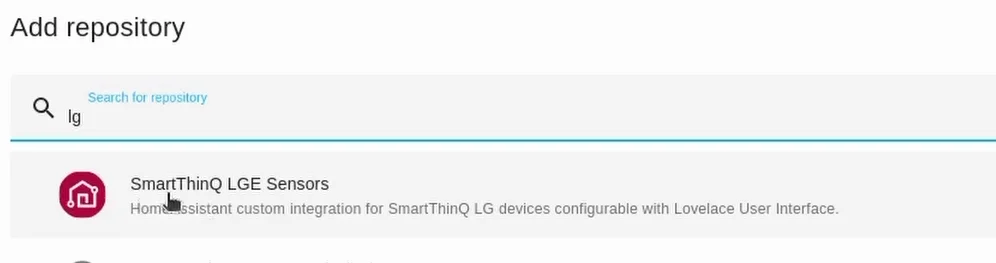
Step 1: In Your Home Assistance in the left panel, Click on HACS > Integrations, then click on “Explore & Download Repositories” Button.
Step 2: Now search for “SmartThinQ LGE Sensors” in search box, Select the option and click on “Download”.
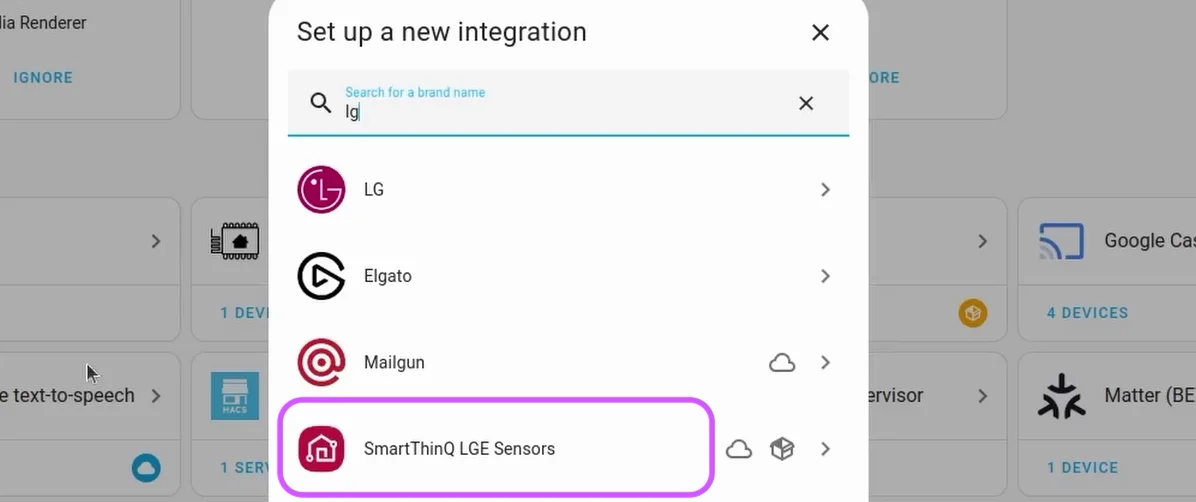
Step 3: Next, Navigate to Home Assistant Settings > Devices & Services then click on “Add Integration” Button from the bottom right-hand corner.
Step 4: On 'Set up a new integration' popup, Search for “SmartThinQ LGE Sensors” and click on it.
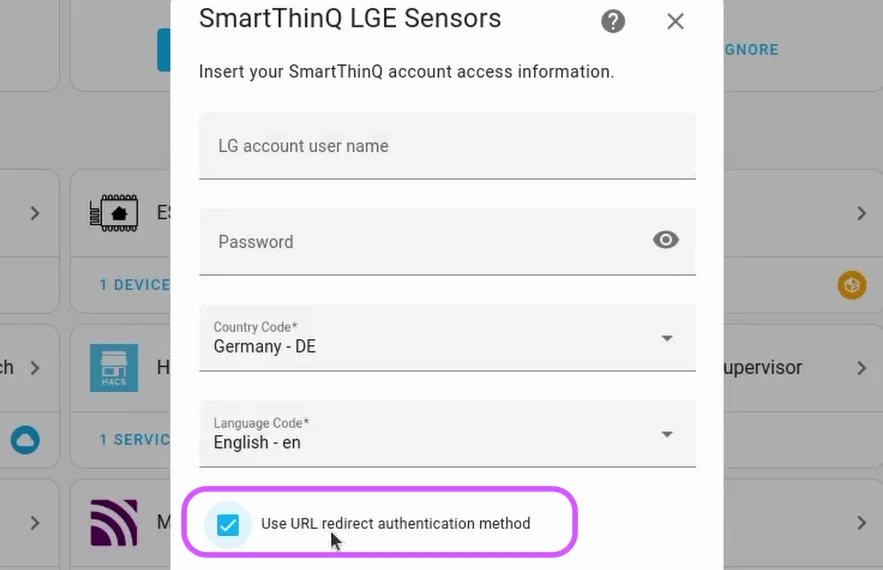
Step 5 : Now there are two ways to provide login credentials:
1. You can directly provide the username and password that you used in your LG ThinQ app. OR 2. You can log in with the credentials (such as social login) in your browser using the “URL redirect authentication method” checkbox.
Login Using The URL Redirect Authentication Method
To Login Using The URL Redirect Authentication Method follow below steps:
Step 1: Select “Use URL redirect authentication method” checkbox and click "Submit" Button.
Step 2: Copy the SmartThinQ login URL and paste it into the browser.
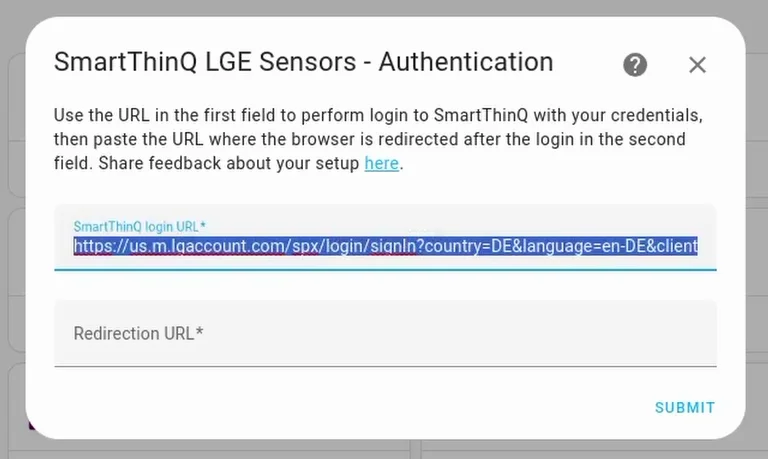
Step 3: Enter your "Username" and "Password".
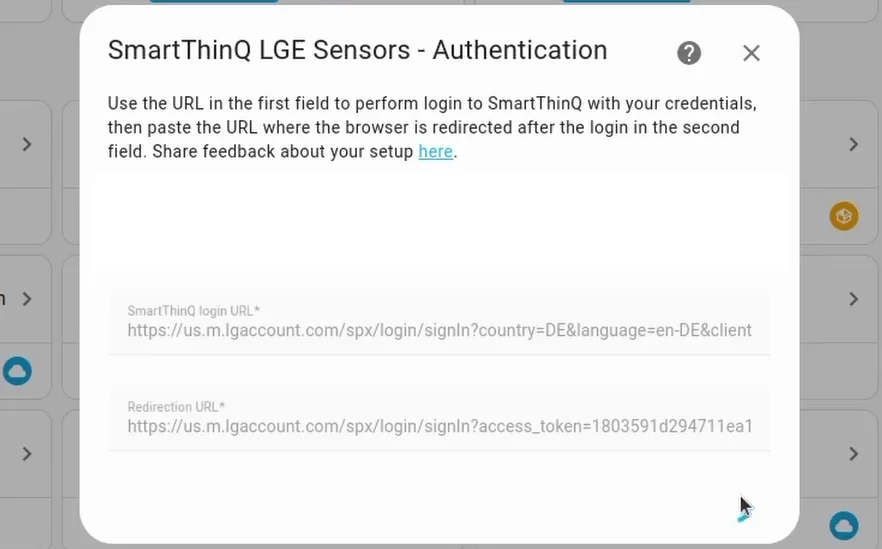
Step 4: Once you log in, your URL will change to show you an access token like this.

Step 5: Now copy the entire URL along with the access token and paste it into the Home Assistant window and click "Submit" Button.
With this, you are done with setting up the connection with Home Assistant and you should see the devices you have added to your LG ThinQ app.
Finding the sensor entities of your devices
Now to add the Washer card to your dashboard, you would need to find the sensor entities of your washer in Home Assistant. If you are aware of this, you can skip to the next section.
To find the sensor entities follow the below steps:
Step 1: Go to Home Assistant Setting > Devices & Services, then click on “SmartThinQ LGE Sensor” card.
Step 2: Now select the device here and we would need the names of two sensor entities. i.e. the Washer and Run State.
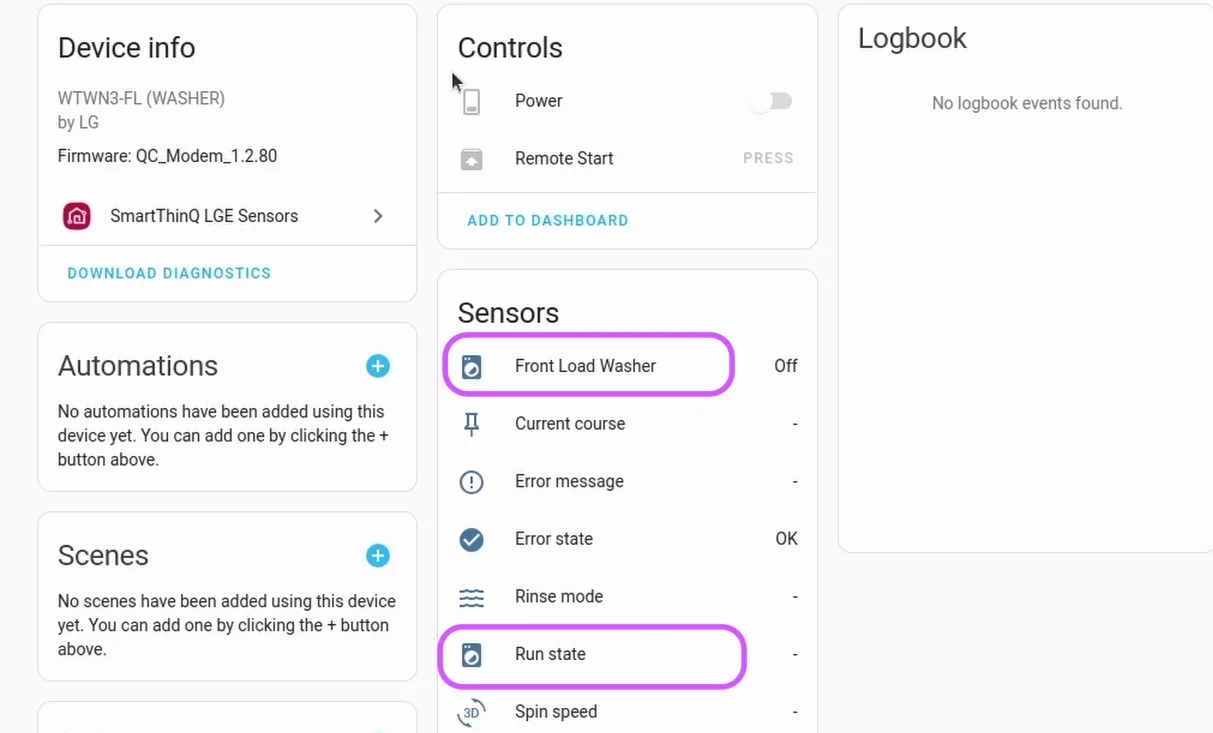
Step 3 : Click on the "Washer icon".
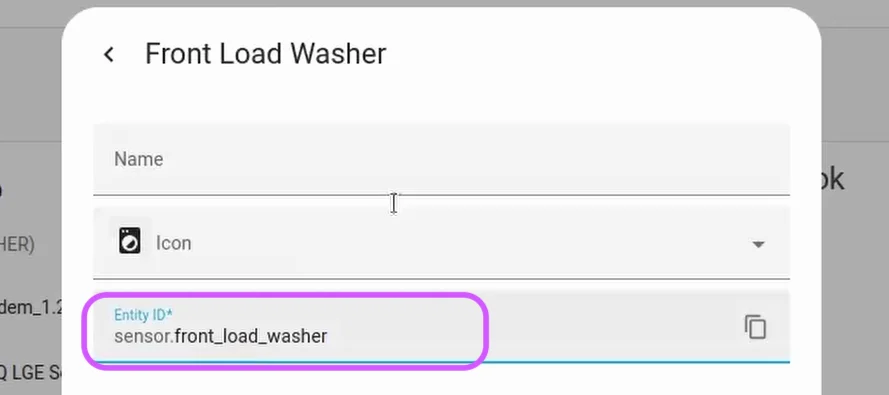
Step 4 : Then click on the gear icon (⚙️) in the left corner, where you will find the sensor entity name.
Step 5 : Perform 'Step 4' in the same manner to find the sensor entity id of the “Run State”.
We will use these 'Sensor Entity Ids' in the Washer card and the template sensors required by the Home Assistant Dashboard.
Adding LG Washer Card to Home Assistant
To add your LG washer card to Home Assistant, we will have to do following three things:
- Setup card code and Stylesheets in Home Assistant.
- Add template sensors.
- Add the Washer card.
Setup Washer Card Code In Home Assistant
To set up the washer card code follow the steps below:
Step 1: Open the SSH terminal on the left panel in Home Assistant.
Step 2: Now type the following commands one by one and hit enter.
cd config
mkdir www
cd www
If the command mkdir www fails, saying that the 'directory already exists' then you can just run the cd wwwcommand.
Step 3 : Run the below command:
git clone https://github.com/phrz/lg-washer-dryer-card.git
Running above command should copy all the folders and directories to your computer from the URL https://github.com/phrz/lg-washer-dryer-card
Step 4 : Now run the following sequence of commands to copy the contents of the folder lg-washer-dryer-card/config/www to your current directory.
cp -r lg-washer-dryer-card/config/www/* /root/config/www/
Now if you run the ls command, you should see some files like these mentioned in the image.

Next, we will have to add some resources to Home Assistant
Adding CSS resource to Home Assistant
To add a CSS resource follow below steps:
Step 1 : Click on “Edit Dashboard” on the top right-hand corner and click on “Manage Resources”.
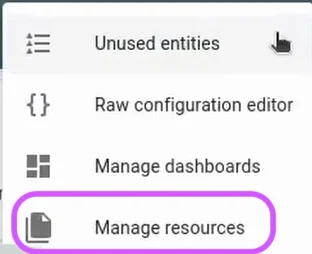
Note: If the option is not available, you will need to enable “Advanced Mode” in your Home Assistant profile settings.
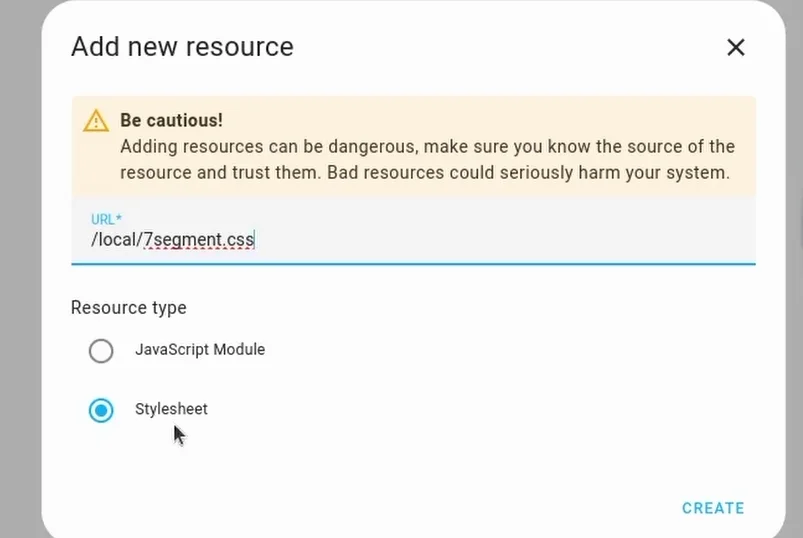
Step 2 : Now add the following path /local/7segment.css and select the Stylesheet radio button and click “Create” Button.
Next, we will need to add some template sensors.
Adding LG Washer Template Sensors in Home Assistant
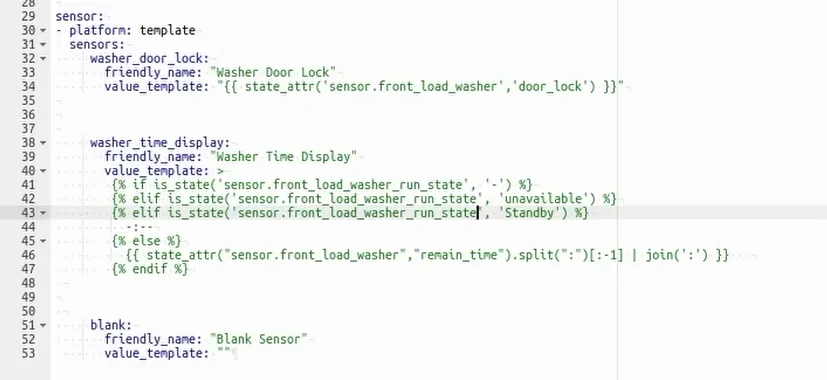
To add the LG washer sensors, first we will have to edit the Home Assistant Configuration file. In order to do so, follow below steps:
Step 1 : Open the "configuration file" in Home Assistant.
Step 2 : Copy the content from this location and paste it into the Home Assistant configuration file.
Step 3 : Now replace the sensor.washer_run_state with the “Run state” sensor entity of your device which we got before.
Step 4 : Similarily replace the sensor.washer with the “Washer” sensor entity of your device.
This is how it should look like.
Step 5 : Restart your Home Assistant and after restarting Home Assistant, Refresh your page (very important).
Now the last step is adding the Washer card to Home Assistant
Adding LG washer Card to Home Assistant
To add the Washer card to your Home Assistant dashboard, follow below steps:
Step 1 : In your Home Assistant “Overview” page, click on “Edit Dashboard” in the top right-hand corner.
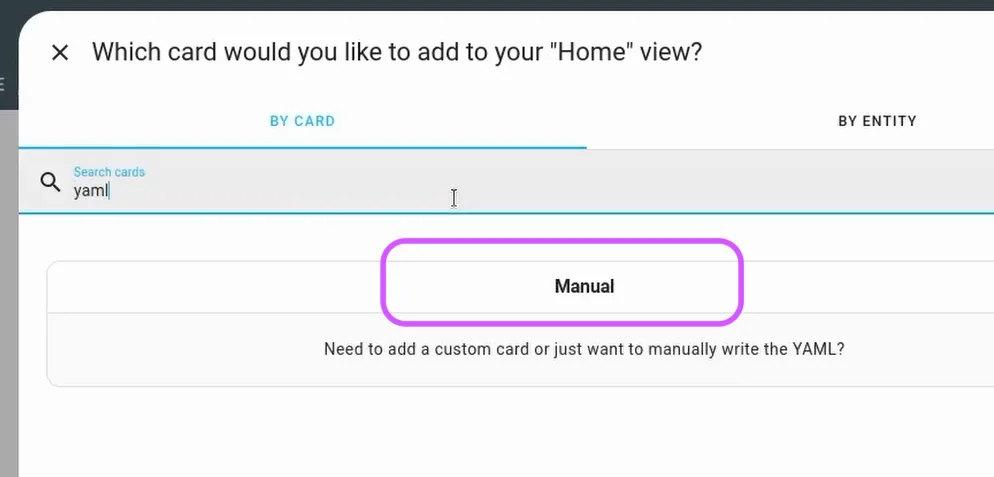
Step 2 : Now, click on “Add Card”, search for YAML, and select the “Manual” option.
Step 3 : Copy the content of the washer-car.yaml file from this location and paste it into the window.
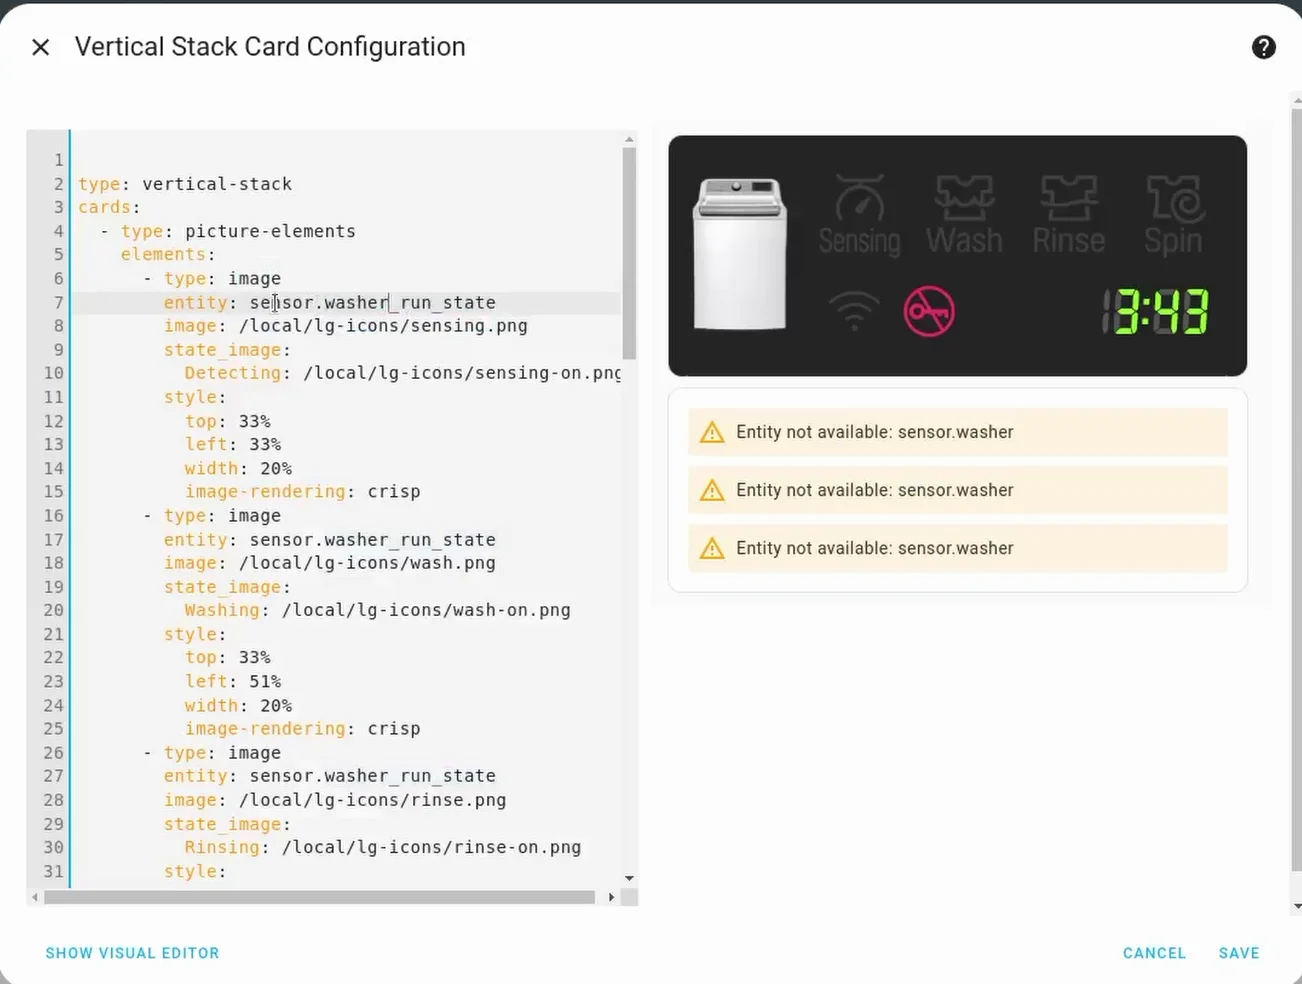
Step 4 : Now you must replace the sensor entities with the correct sensor entities for your device to solve 'exclamation symbols'.
In this case, you will have to replace the sensor.washer and sensor.washer_run_statewith the sensor entities of your device.
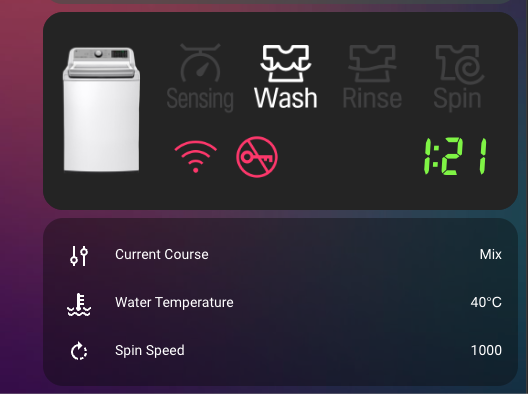
On saving you should see your entities show up as below displayed in image.
If you are interested in exploring more of such easy to follow step by step guides about Home Assistant, then here are a few suggestions
- ESP32 as a Local Voice Assistant
- Control LED Strip with Home Assistant Using WLED
- How I Added a Matter Device to Home Assistant)