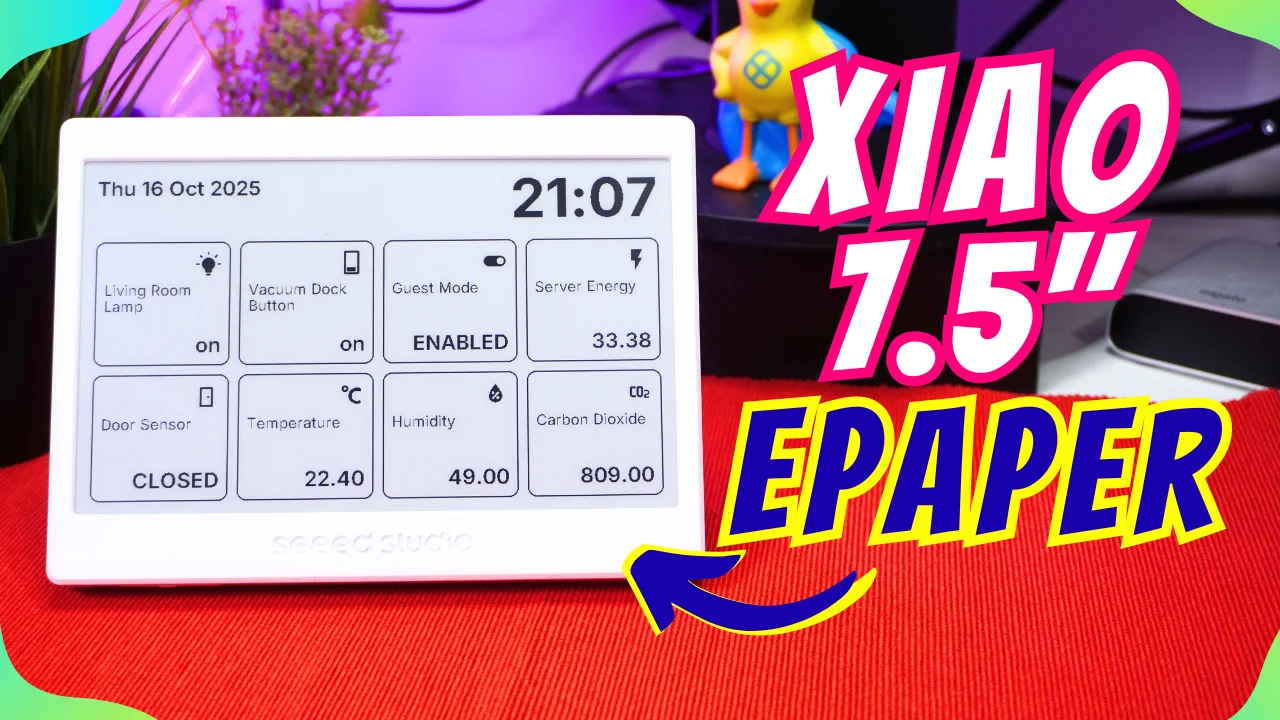
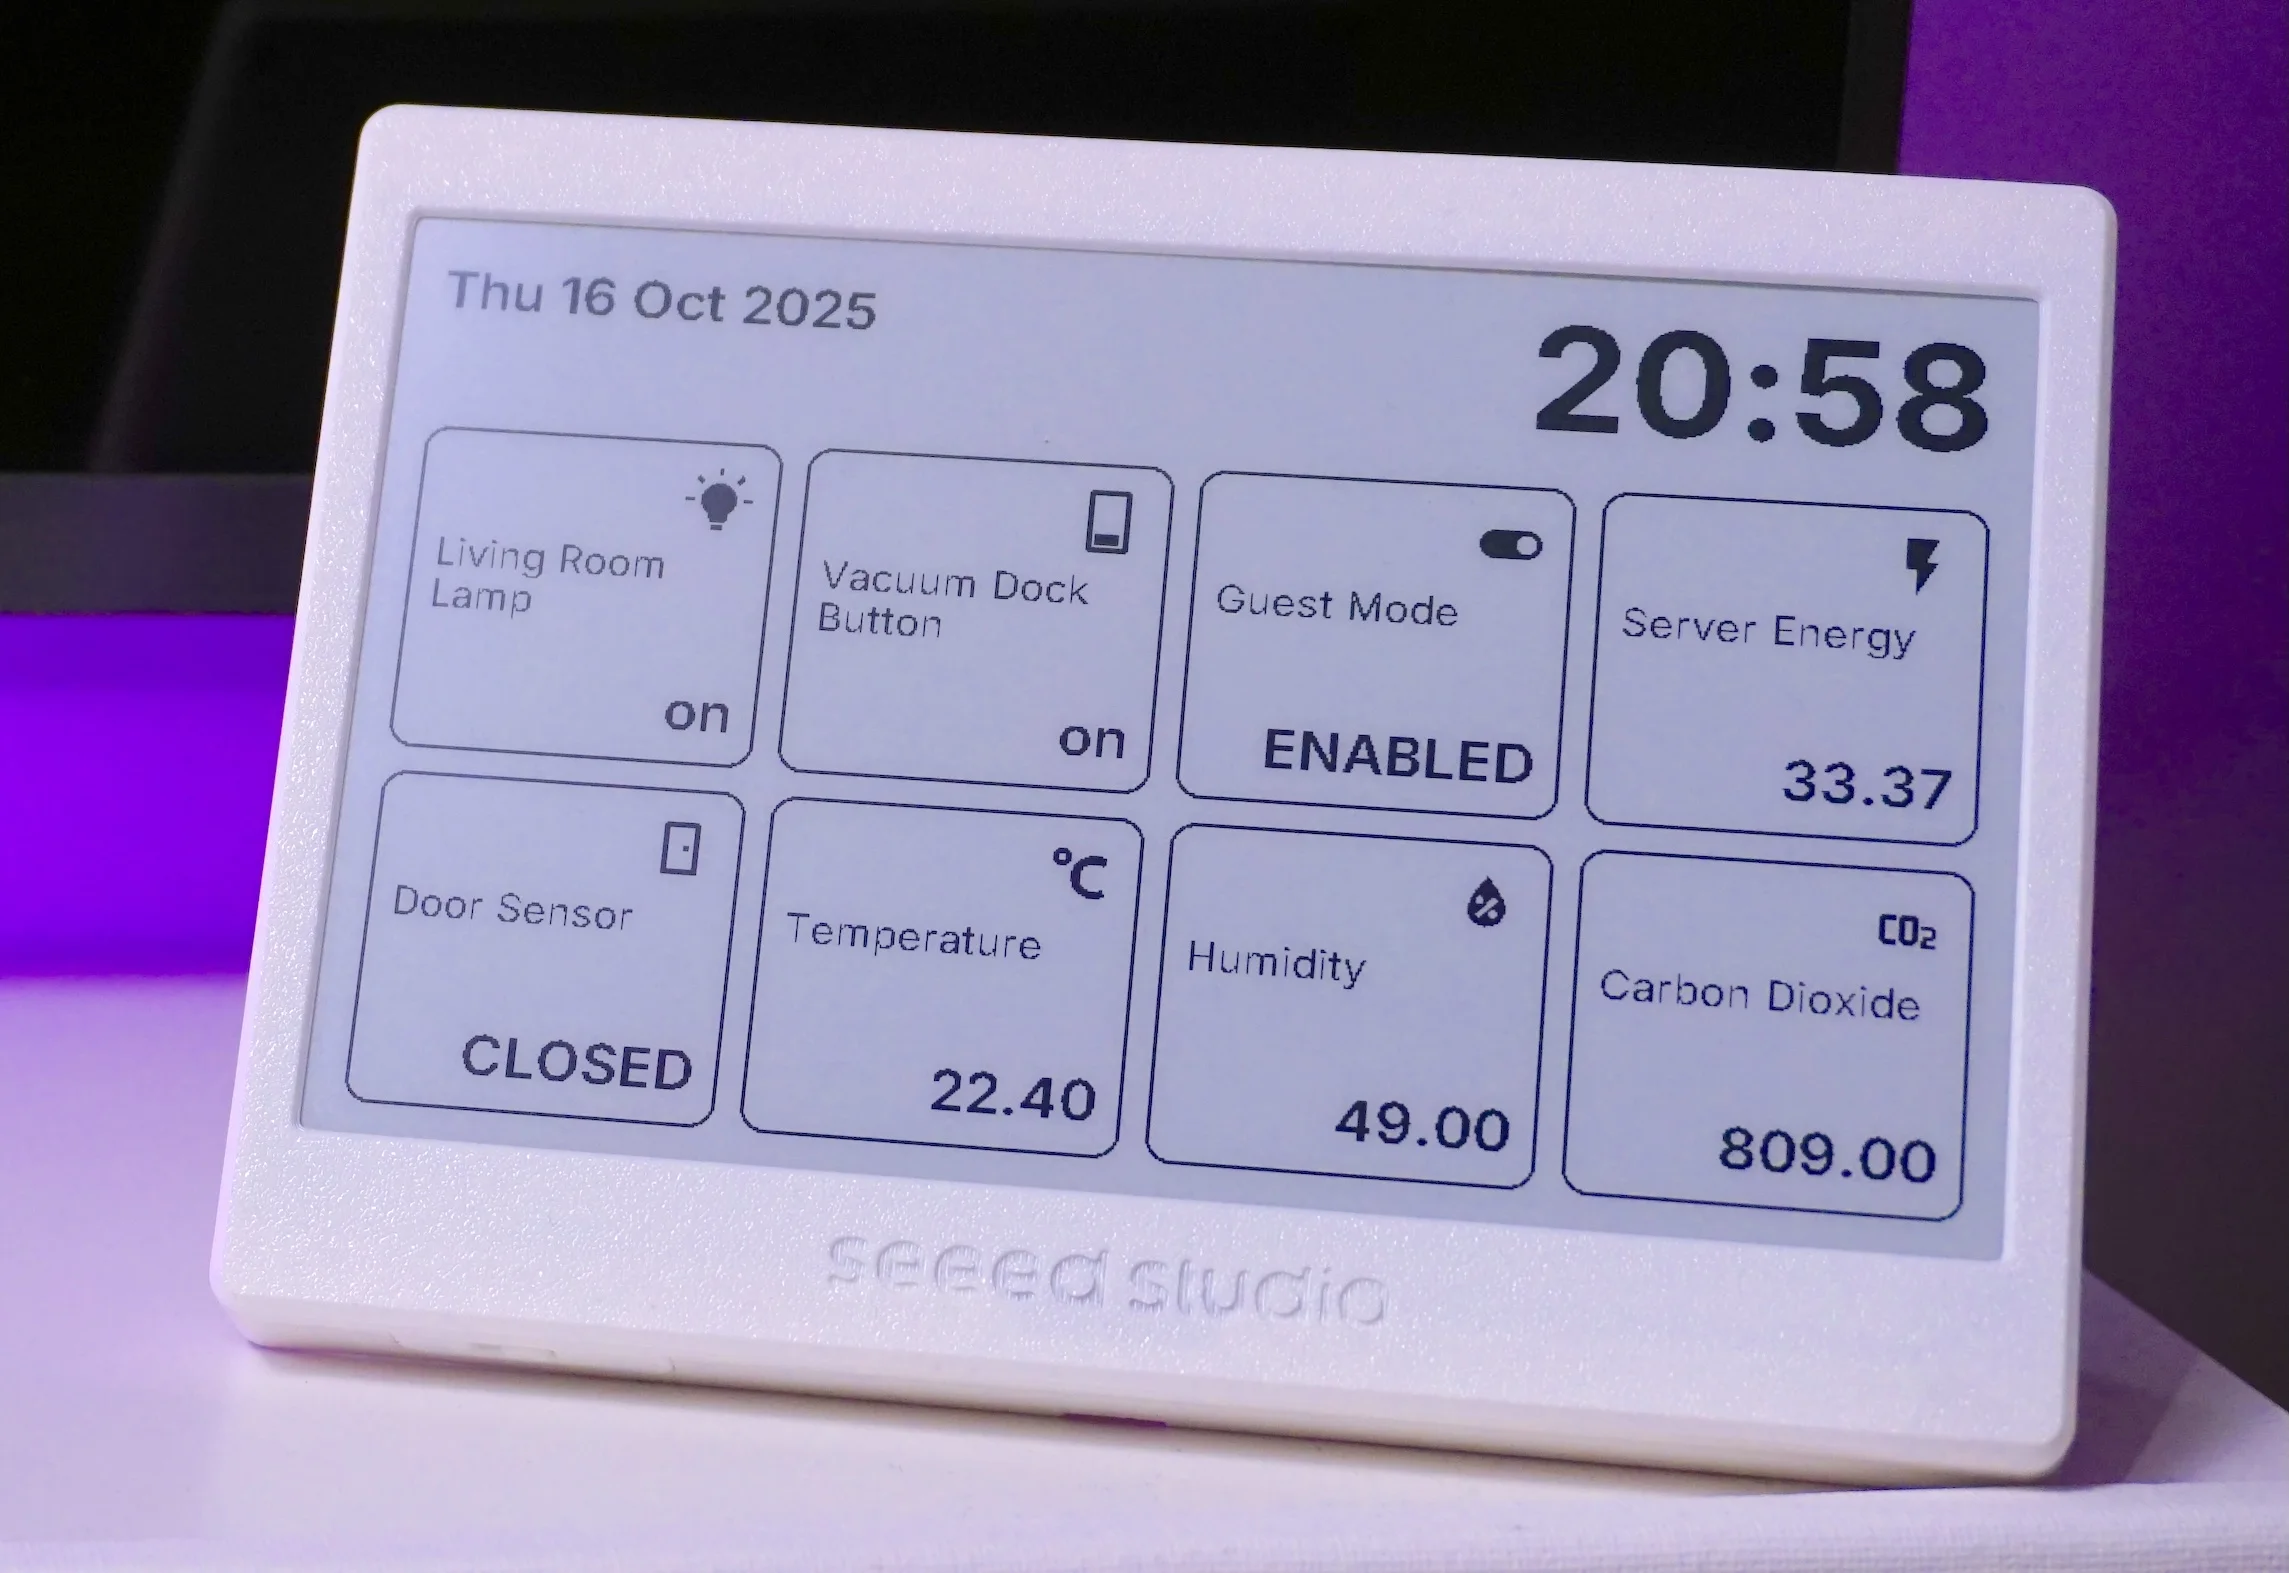
A Local E-Paper Dashboard for Home Assistant (Seeed Studio Xiao 7.5 inch ePaper Display + ESPHome)
Written by
Featured Video
Table of Contents
- About XIAO 7.5" ePaper Panel
- This was my approach (at a glance)
- Creating the device in ESPHome
- Pulling time & states from Home Assistant
- Using icons (glyphs) on the e-paper
- Drawing cards with a helper function
- Full ESPHome Configuration
- What I learnt while using AI to generate the dashboard.
- Keeping it local (and other options)
- Power & refresh notes
- ChatGPT Prompt To Create Your Own Dashboard
I’ve been tinkering with a XIAO 7.5" ePaper Panel display from Seeed Studio, and I turned it into a clean, battery-powered dashboard that pulls live data from Home Assistant. In this write-up I’ll walk you through how I built it in ESPHome, how I handled icons and fonts, how I grabbed entity states from Home Assistant, and how I iterated on the layout—with a little help from AI.
XIAO 7.5 inch ePaper Panel Display:
About XIAO 7.5" ePaper Panel
- MCU: ESP32-C3
- Display: Monochrome e-paper
- Power: Built-in 2000 mAh battery
- Enclosure: 3D-printed case with a kickstand
- Firmware options: ESPHome (what I used), Arduino IDE, or cloud services via Terminal
This was my approach (at a glance)
- Create a new ESPHome device for the ESP32-C3.
- Setup up SPI pins to talk to the e-paper panel.
- Define fonts (including icon glyphs).
- Pull time and sensor/switch states from Home Assistant.
- Draw a simple card for each entity (icon + label + state).
- Iterate, iterate, iterate—until the layout felt right.
I didn’t start from scratch—AI sped up the boilerplate of drawing the layout based on the input I gave for the look and feel. I used ESPHome to keep everything local (no cloud dashboards), because I wanted the device to talk directly to my Home Assistant.
Creating the device in ESPHome
I added a new device for the ESP32-C3 and enabled the display via SPI.
spi:
  clk_pin: GPIO8
  mosi_pin: GPIO10

display:
  - platform: waveshare_epaper
    id: eink
    cs_pin: GPIO3
    dc_pin: GPIO5
    reset_pin: GPIO2
    busy_pin:
      number: GPIO4
      inverted: true        # Required on 7.50in V2
    model: 7.50inV2         # If odd behavior, try 7.50inV2alt or 7.50inV2p
    auto_clear_enabled: false
    update_interval: 60s     # ePaper needs a real interval (not "never")
      // I draw all cards from a helper function (see below).
Pulling time & states from Home Assistant
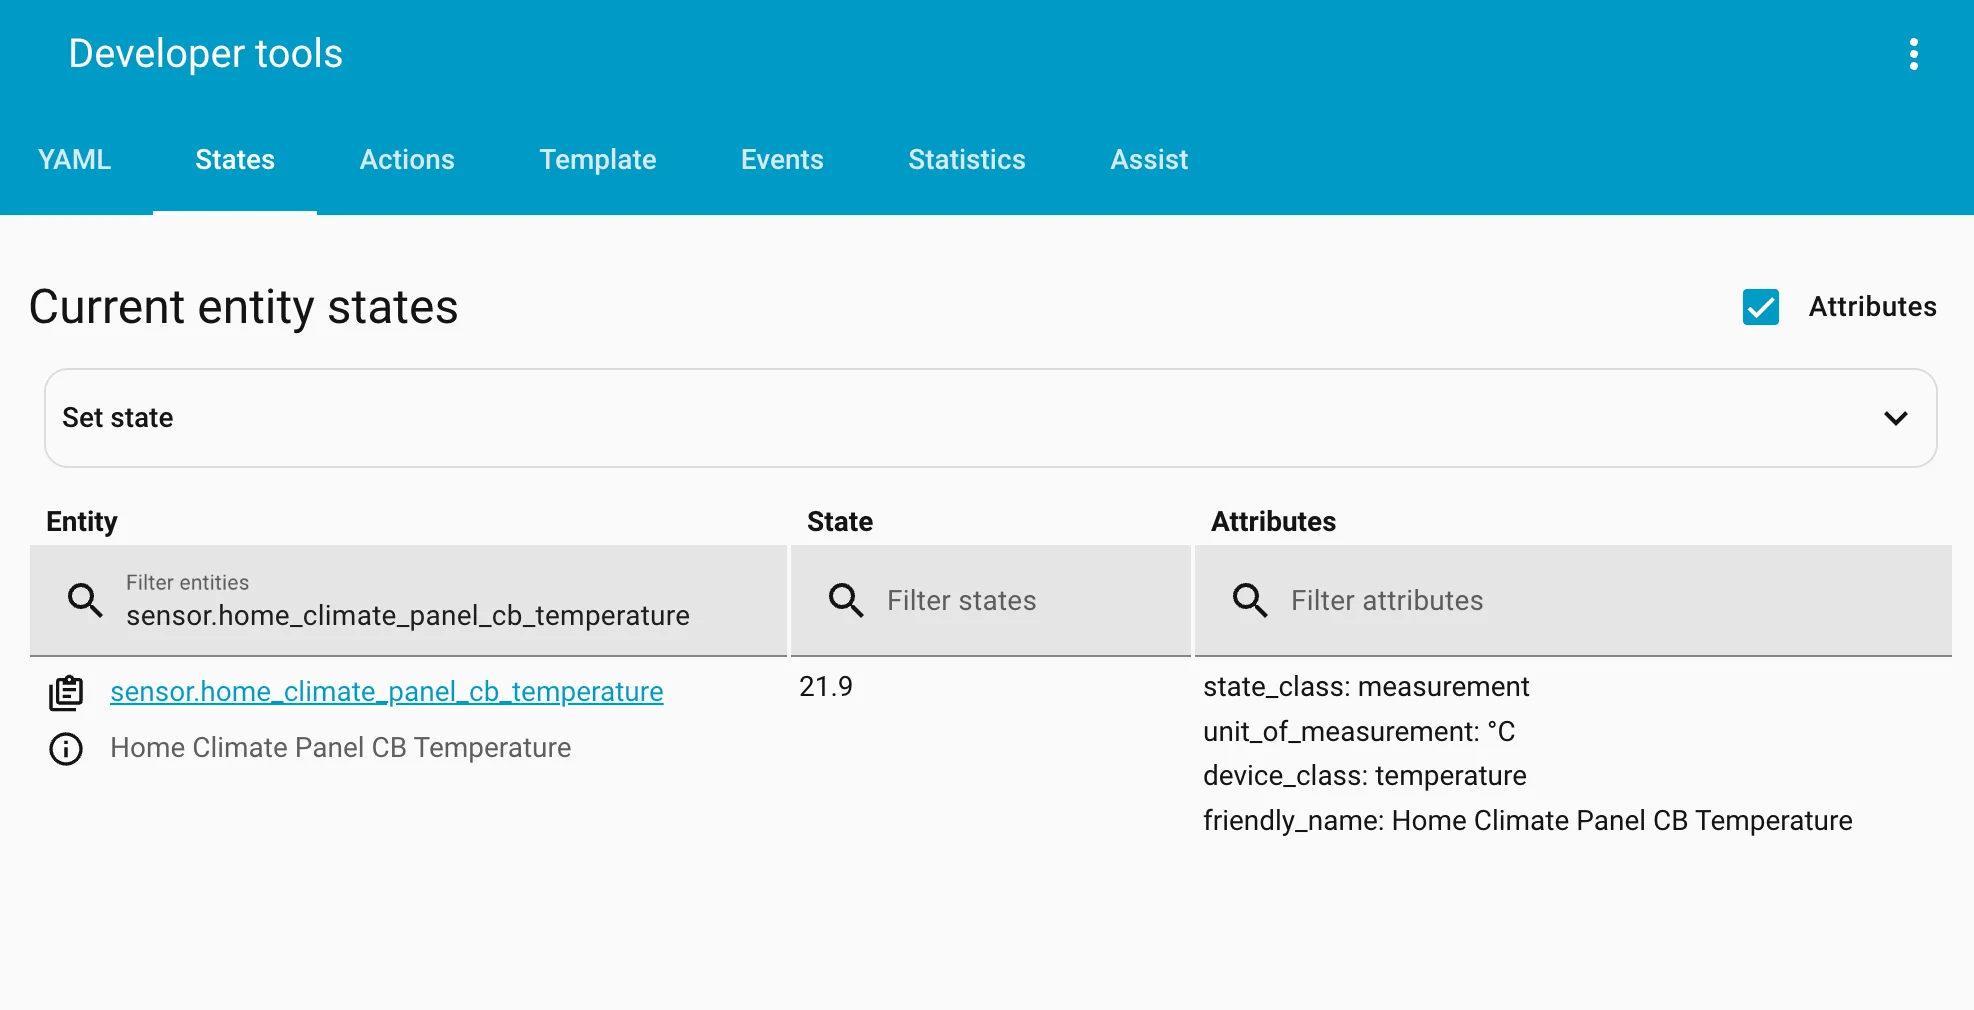
I use Home Assistant as the source of data: time, sensors, and switches. In ESPHome, I define text sensors for each entity I want to show. This makes it easy to reference current values in the display lambda.
time:
  - platform: homeassistant
    id: ha_time

text_sensor:
  - platform: homeassistant
    id: ts_light_living
    entity_id: light.living_room_lamp

sensor:
  # Optional: brightness (0–255) for the light; we'll show % when it's on
  - platform: homeassistant
    id: server_plug
    entity_id: sensor.home_climate_panel_cb_temperature   # confirm this in HA → Dev Tools → States
    on_value:
      - component.update: eink

binary_sensor:
  - platform: homeassistant
    id: door_sensor
    entity_id: binary_sensor.door_sensor_opening_2
    on_state:
      - component.update: eink
To find an entity ID, I went to Home Assistant → Developer Tools → States, copy the exact entity_id, and paste it into my ESPHome config.
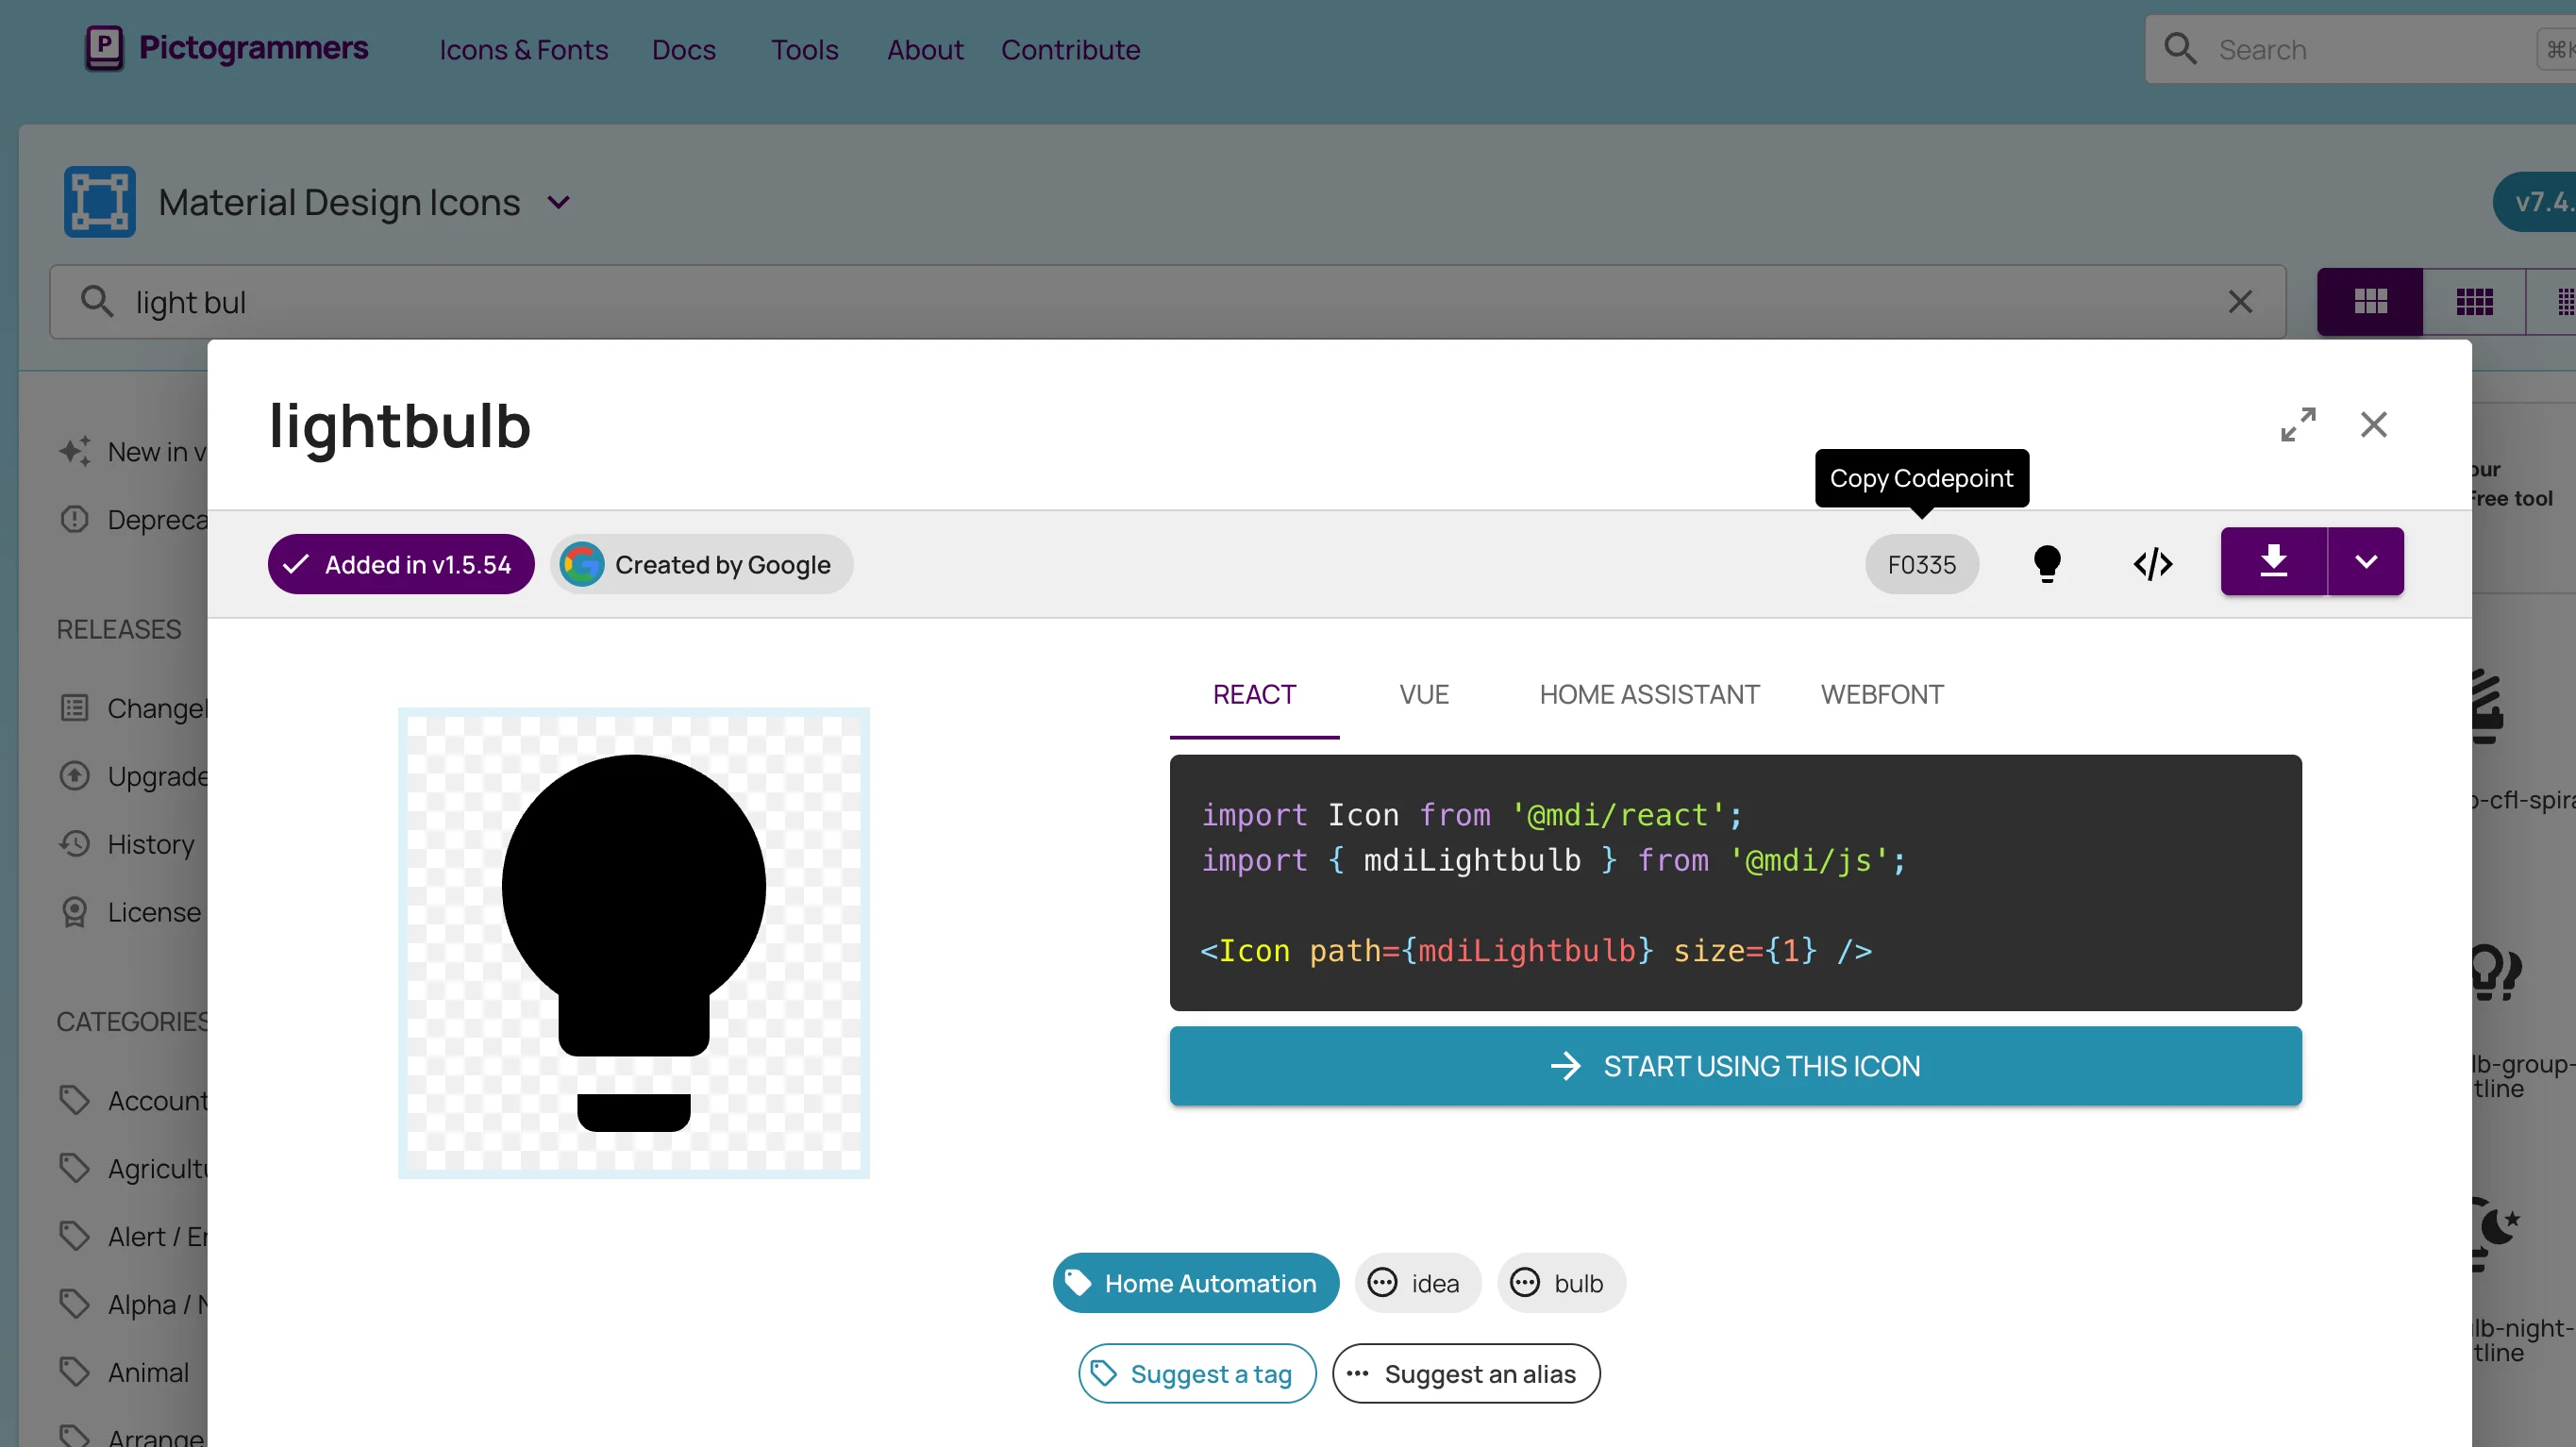
Using icons (glyphs) on the e-paper
I wanted to each card to have an icon. For that, I loaded a font that contains Material Design Icons and list the glyphs I plan to use. Each icon is referenced by its Unicode codepoint.
font:
  - file: "gfonts://Inter@400"
    id: f_small
    size: 20
  - file: "gfonts://Inter@700"
    id: f_clock
    size: 76
  - file: "https://cdnjs.cloudflare.com/ajax/libs/MaterialDesign-Webfont/7.4.47/fonts/materialdesignicons-webfont.ttf"
    id: f_icon
    size: 36
    # List only the icons you actually use (saves flash + avoids missing-glyph errors)
    # Visit this page to get ICON values: https://pictogrammers.com/library/mdi/
    # Dont forget to add the value as variable in the code
    glyphs:
      - "\U000F0335"   # mdi-lightbulb
      - "\U000F06E8"   # mdi-lightbulb-on
      - "\U000F0521"   # mdi-toggle-switch
How I pick an icon codepoint: I open an icon set site, copy the F value, add \U000 preceeding it, add it to glyphs, and then use it as a variable in the display.
Drawing cards with a helper function
ChatGPT created this small card function that keeps my layout consistent. It takes x/y position, a label, a state string, and an icon codepoint (as a UTF-8 character). I call it repeatedly to place cards in a grid.
      // Icon variable
      static const char* ICON_TEMPERATURE  = "\U000F0504";  // mdi-temperature

      // Temperature sensor example
      std::string temperature_sensor_value = id(temperature_sensor).has_state()
      ? std::string(String(id(temperature_sensor).state).c_str())
      : std::string("--");

      draw_card(1, 1, "Temperature ", temperature_sensor_value, ICON_TEMPERATURE);
Full ESPHome Configuration
Here is the full ESPHome configuration you can use. You have to update the entity ids and the part of the lambda if needed. I have added comments to help you know where to edit.
esphome:
  name: seeed-studio-epaper-panel
  friendly_name: Seeed-studio-epaper-panel


esp32:
  board: seeed_xiao_esp32c3
  variant: esp32c3
  framework:
    type: arduino


# Enable logging
logger:

# Enable Home Assistant API
api:
  encryption:
    key: "4eaEkedq0WpOjjzrVKlofkrb0eoAab3wNqS4psawh34="

ota:
  - platform: esphome
    password: "dd2a04431a7e907f10bd7423682b0b1f"

wifi:
  ssid: !secret wifi_ssid
  password: !secret wifi_password


  # Enable fallback hotspot (captive portal) in case wifi connection fails
  ap:
    ssid: "Seeed-Studio-Epaper-Panel"
    password: "Bvi4FHrHvSOd"


spi:
  clk_pin: GPIO8
  mosi_pin: GPIO10

display:
  - platform: waveshare_epaper
    id: eink
    cs_pin: GPIO3
    dc_pin: GPIO5
    reset_pin: GPIO2
    busy_pin:
      number: GPIO4
      inverted: true        # Required on 7.50in V2
    model: 7.50inV2         # If odd behavior, try 7.50inV2alt or 7.50inV2p
    auto_clear_enabled: false
    update_interval: 60s     # ePaper needs a real interval (not "never")
    lambda: |-
      // ===== Canvas
      const int W = 800, H = 480;

      // ===== Header (same height; bigger clock only)
      it.filled_rectangle(0, 0, W, 100, COLOR_OFF);
      auto now = id(ha_time).now();
      char date_str[32], time_str[16];
      now.strftime(date_str, sizeof(date_str), "%a %d %b %Y");
      now.strftime(time_str, sizeof(time_str), "%H:%M");

      // Date (left) + BIG clock (right)
      it.print(20, 18, id(f_big), date_str);
      it.print(W - 20, 6, id(f_clock), TextAlign::TOP_RIGHT, time_str);

      // ===== Grid geometry (unchanged)
      const int cols = 4, rows = 2;
      const int gap  = 12, pad = 12;
      const int cellW = (W - 2*20 - (cols - 1)*gap) / cols;
      const int cellH = 170;              // tall enough for icon row + 2 title lines
      const int startX = 20, startY = 110;


      // ─── helpers: rounded rectangles ────────────────────────────────────────────
      auto fill_round_rect = [&](int x, int y, int w, int h, int r, bool black) {
        auto C = black ? COLOR_ON : COLOR_OFF;
        // center bar
        it.filled_rectangle(x + r, y,       w - 2*r, h,       C);
        // side bars
        it.filled_rectangle(x,       y + r, r,       h - 2*r, C);
        it.filled_rectangle(x + w-r, y + r, r,       h - 2*r, C);
        // corners (quarter circles)
        it.filled_circle(x + r,         y + r,         r, C);         // TL
        it.filled_circle(x + w - r - 1, y + r,         r, C);         // TR
        it.filled_circle(x + r,         y + h - r - 1, r, C);         // BL
        it.filled_circle(x + w - r - 1, y + h - r - 1, r, C);         // BR
      };

      auto round_rect_border = [&](int x, int y, int w, int h, int r, int t) {
        // Draw outer black, then punch inner white = border of thickness t
        fill_round_rect(x, y, w, h, r, /*black=*/true);
        int xi = x + t, yi = y + t, wi = w - 2*t, hi = h - 2*t, ri = std::max(0, r - t);
        fill_round_rect(xi, yi, wi, hi, ri, /*black=*/false);
      };

      // ─── helper: wrap text into up to 2 lines (word-based) ─────────────────────
      auto wrap_two_lines = [&](const std::string& text, int max_chars_per_line) {
        std::string l1, l2, word;
        int used1 = 0, used2 = 0;
        auto try_add = [&](std::string& line, int& used, const std::string& w) -> bool {
          int wlen = (int)w.size();
          if (used == 0 ? (wlen <= max_chars_per_line)
                        : (used + 1 + wlen) <= max_chars_per_line) {
            line += (used ? " " : "") + w;
            used += (used ? 1 : 0) + wlen;
            return true;
          }
          return false;
        };
        for (size_t i = 0; i <= text.size(); ++i) {
          char c = (i < text.size()) ? text[i] : ' ';
          if (c == ' ') {
            if (!word.empty()) {
              if (l2.empty()) {
                if (!try_add(l1, used1, word)) {
                  if (!try_add(l2, used2, word)) {
                    if (!l2.empty()) l2 += "…";
                    else l1 = l1.substr(0, std::max(0, max_chars_per_line - 1)) + "…";
                    return std::pair<std::string,std::string>(l1, l2);
                  }
                }
              } else {
                if (!try_add(l2, used2, word)) {
                  l2 += "…";
                  return std::pair<std::string,std::string>(l1, l2);
                }
              }
              word.clear();
            }
          } else {
            word.push_back(c);
          }
        }
        return std::pair<std::string,std::string>(l1, l2);
      };

      // ─── card renderer (rounded border, reserved icon row, safe text) ──────────
      auto draw_card = [&](int cx, int cy,
                          const std::string& title,
                          const std::string& value,
                          const char* icon) {
        int x = startX + cx * (cellW + gap);
        int y = startY + cy * (cellH + gap);
        int w = cellW, h = cellH;

        // Clear + rounded border (radius 12, border thickness 2)
        round_rect_border(x, y, w, h, /*r=*/12, /*t=*/2);

        // Layout constants (tune to your actual font sizes)
        const int ICON_EM         = 36;  // match your f_icon size
        const int ICON_ROW_GAP    = 6;   // spacing under icon row
        const int TITLE_LINE_H    = 22;  // ~ line height for f_small (~20px)
        const int VALUE_EM        = 30;  // ~ visual height for f_big

        // Icon row (top-right)
        it.printf(x + w - pad, y + pad, id(f_icon), TextAlign::TOP_RIGHT, "%s", icon);

        // Guards for title vs value to avoid overlap
        const int title_top       = y + pad + ICON_EM + ICON_ROW_GAP; // start under icon row
        const int value_baseline  = y + h - pad;                      // bottom text baseline
        const int value_top_limit = value_baseline - VALUE_EM - 4;    // keep gap above value

        // Title wrapping across full width (no icon reserve)
        const int char_px_title = 10;               // ~ px/char for f_small
        const int avail_w       = w - 2 * pad;
        int max_chars           = std::max(10, avail_w / char_px_title);
        auto twolines           = wrap_two_lines(title, max_chars);

        if (title_top < value_top_limit) {
          it.print(x + pad, title_top, id(f_small), twolines.first.c_str());
        }
        int l2_y = title_top + TITLE_LINE_H;
        if (!twolines.second.empty() && (l2_y < value_top_limit)) {
          it.print(x + pad, l2_y, id(f_small), twolines.second.c_str());
        }

        // Value (bottom-right), trimmed to fit width
        std::string v = value;
        const int char_px_val = 13;                 // ~ px/char for f_big
        int max_val_chars = std::max(7, avail_w / char_px_val);
        if ((int)v.size() > max_val_chars) v = v.substr(0, max_val_chars - 1) + "…";
        it.print(x + w - pad, value_baseline, id(f_big), TextAlign::BOTTOM_RIGHT, v.c_str());
      };

      // ==========================================================================
      // ==================== EDIT FROM HERE  =====================================
      // ==========================================================================

      // ===== Icon glyphs (Don't forget to ensure these are in your f_icon font's glyphs list)
      static const char* ICON_LIGHT      = "\U000F0335"; // mdi-lightbulb
      static const char* ICON_LIGHT_ON   = "\U000F06E8"; // mdi-lightbulb-on
      static const char* ICON_TOGGLE     = "\U000F0521"; // mdi-toggle-switch
      static const char* ICON_TAPBTN     = "\U000F12A8"; // mdi-gesture-tap-button
      static const char* ICON_ROBOT      = "\U000F1A26"; // mdi-robot-vacuum
      static const char* ICON_FLASH      = "\U000F0241"; // mdi-flash
      static const char* ICON_CO2        = "\U000F07E4";
      static const char* ICON_HUMIDITY   = "\U000F058E";  // mdi-humidity
      static const char* ICON_DOOR       = "\U000F081A";  // mdi-door
      static const char* ICON_TEMPERATURE  = "\U000F0504";  // mdi-temperature

      // ===================== CARDS Section ===========================
      // ============== ADD or EDIT YOUR CARDS FROM HERE  ====================

      // Light
      std::string light_state = id(ts_light).state;            // "on"/"off"
      const char* light_icon  = (light_state == "on") ? ICON_LIGHT_ON : ICON_LIGHT;
      draw_card(0, 0, "Living Room Lamp", light_state, light_icon);

      // Button (raw value shown; trimmed in draw_card)
      std::string button_state = id(ts_button).state;          // ISO ts or text
      draw_card(1, 0, "Vacuum Dock Button", button_state, ICON_ROBOT);

      // Input Boolean Example
      std::string guest_state = id(ts_guest_mode).state;       // "on"/"off"
      bool guest_on = (guest_state == "on");
      draw_card(2, 0, "Guest Mode", guest_on ? "ENABLED" : "DISABLED", ICON_TOGGLE);

      // Energy value exmample
      std::string energy_str = id(server_plug).has_state()
      ? std::string(String(id(server_plug).state).c_str())
      : std::string("--");
      draw_card(3, 0, "Server Energy", energy_str, ICON_FLASH);

      // Door sensor example
      const bool is_open = id(door_sensor).has_state() ? id(door_sensor).state : false;
      std::string door_value = is_open ? "OPEN" : "CLOSED";
      draw_card(0, 1, "Door Sensor", door_value, ICON_DOOR);

      // Temperature sensor example
      std::string temperature_sensor_value = id(temperature_sensor).has_state()
      ? std::string(String(id(temperature_sensor).state).c_str())
      : std::string("--");
      draw_card(1, 1, "Temperature ", temperature_sensor_value, ICON_TEMPERATURE);

      // Humidity sensor example
      std::string humidity_sensor_value = id(humidity_sensor).has_state()
      ? std::string(String(id(humidity_sensor).state).c_str())
      : std::string("--");
      draw_card(2, 1, "Humidity", humidity_sensor_value, ICON_HUMIDITY);

      // CO2 sensor example
      std::string co2_sensor_value = id(co2_sensor).has_state()
      ? std::string(String(id(co2_sensor).state).c_str())
      : std::string("--");
      draw_card(3, 1, "Carbon Dioxide", co2_sensor_value, ICON_CO2);


font:
  - file: "gfonts://Inter@700"
    id: f_title
    size: 40
  - file: "gfonts://Inter@600"
    id: f_big
    size: 28
  - file: "gfonts://Inter@400"
    id: f_small
    size: 20
  - file: "gfonts://Inter@700"
    id: f_clock
    size: 76
  - file: "https://cdnjs.cloudflare.com/ajax/libs/MaterialDesign-Webfont/7.4.47/fonts/materialdesignicons-webfont.ttf"
    id: f_icon
    size: 36
    # List only the icons you actually use (saves flash + avoids missing-glyph errors)
    # Visit this page to get ICON values: https://pictogrammers.com/library/mdi/
    # Dont forget to add the value as variable in the code
    glyphs:
      - "\U000F0335"   # mdi-lightbulb
      - "\U000F06E8"   # mdi-lightbulb-on
      - "\U000F0521"   # mdi-toggle-switch
      - "\U000F12A8"   # mdi-gesture-tap-button
      - "\U000F1A26"
      - "\U000F0241"   # flash
      - "\U000F07E4"   # CO2
      - "\U000F0504"   # degree celcius
      - "\U000F058E"   # Humidity
      - "\U000F081A"   # Door


time:
  - platform: homeassistant
    id: ha_time
    on_time:
      - seconds: 0           # fires at 00s of every minute
        then:
          - component.update: eink


text_sensor:
  # Light state ("on"/"off")
  - platform: homeassistant
    id: ts_light
    entity_id: light.light
    on_value: [component.update: eink]

  - platform: homeassistant
    id: ts_button
    entity_id: switch.3d_printer_switch
    on_value: [component.update: eink]

  - platform: homeassistant
    id: ts_guest_mode
    entity_id: input_boolean.light
    on_value: [component.update: eink]

binary_sensor:
  - platform: homeassistant
    id: door_sensor
    entity_id: binary_sensor.door_sensor_opening_2
    on_state:
      - component.update: eink
sensor:
  - platform: homeassistant
    id: server_plug
    entity_id: sensor.server_plug_summation_delivered   # confirm this in HA → Dev Tools → States
    on_value:
      # - lambda: |-
      #     ESP_LOGD("eink", "server_plug=%.3f", x);      // debug so you see when it updates
      - component.update: eink

  - platform: homeassistant
    id: temperature_sensor
    entity_id: sensor.home_climate_panel_cb_temperature   # confirm this in HA → Dev Tools → States
    on_value:
      - component.update: eink

  - platform: homeassistant
    id: humidity_sensor
    entity_id: sensor.home_climate_panel_cb_humidity   # confirm this in HA → Dev Tools → States
    on_value:
      - component.update: eink

  - platform: homeassistant
    id: co2_sensor
    entity_id: sensor.meter_pro_co2_monitor_carbon_dioxide  # confirm this in HA → Dev Tools → States
    on_value:
      - component.update: eink
What I learnt while using AI to generate the dashboard.
- A paid model (I used the GPT-5 Thinking model) gave me faster, more accurate ESPHome snippets.
- The free ChatGPT tier sometimes suggested outdated patterns that didn’t compile.
- Copilot’s free tier (GPT-4 o model) performed better than the free ChatGPT tier in my tests.
- If you want to stay free, Copilot’s GPT-4 o model is a good starting point.
- If you’re okay spending a bit, a paid GPT model saves time when you’re customizing layouts.
Keeping it local (and other options)
I built this to stay fully local with ESPHome + Home Assistant.
If you prefer a cloud route, Siege Studio provides documentation for using TRMNL Cloud APIs to build dashboards (including pre-built layouts). That path requires a license for cloud access.
Power & refresh notes
- The 2000 mAh battery gives me plenty of runtime with infrequent refreshes.
- E-paper shines for glanceable data that doesn’t change every second.
- I set
update_intervalto 60s for testing; for daily use you can push it higher to save power.
ChatGPT Prompt To Create Your Own Dashboard
I’m sharing the prompt that helped me generate the first iteration of the dashboard. You can tweak the prompt with your own entities and layout goals to generate a custom look.
I have this Xiao 7.5" Monochrome ePaper Display. Its an 800 x 480 resolution display.
I want you create a nice dashboard which includes the following.
1. show the date and time fetched from Home Assistant . The date and time is nicely formated in human readable format.
2. show the state of 4 sensors and 4 switches in a nice card style fashion.  It should contain the name, state of the sensor or switches, and an icon.
3. I want all these sensor and switches in a separate section, so that I can provide custom names to be displayed in the card for each of them and the entity id and these custom names are displayed along with the entity state in the cards.
4. when the state of the sensors and the switches update, it should update the value in the display.

use the fonts I have mentioned below and you can add more font sizes to use in various sections if you want.
I have also added a icon font, so that you can use icons from material design icons.
add any icons you would like to use.
I want you to give me a YAML code for esphome. So that I can paste it in ESPhome and compile it.

Use this initial esphome code and give me the remaining code. Also make sure that you use the entire space in the display which has a resolution of 800 x 480. Also make sure that there is enough padding on all four sides of the screen to make it look nice.

"""
esphome:
  name: seeed-studio-epaper-panel
  friendly_name: Seeed-studio-epaper-panel


esp32:
  board: seeed_xiao_esp32c3
  variant: esp32c3
  framework:
    type: arduino


# Enable logging
logger:

# Enable Home Assistant API
api:
  encryption:
    key: "4eaEkedq0WpOjjzrVKlofkrb0eoAab3wNqS4psawh34="

ota:
  - platform: esphome
    password: "dd2a04431a7e907f10bd7423682b0b1f"

wifi:
  ssid: !secret wifi_ssid
  password: !secret wifi_password


  # Enable fallback hotspot (captive portal) in case wifi connection fails
  ap:
    ssid: "Seeed-Studio-Epaper-Panel"
    password: "Bvi4FHrHvSOd"


spi:
  clk_pin: GPIO8
  mosi_pin: GPIO10

display:
  - platform: waveshare_epaper
    id: eink
    cs_pin: GPIO3
    dc_pin: GPIO5
    reset_pin: GPIO2
    busy_pin:
      number: GPIO4
      inverted: true
    model: 7.50inV2
    auto_clear_enabled: false
    update_interval: 60s
    lambda: |-
"""